Basic Radio Setup
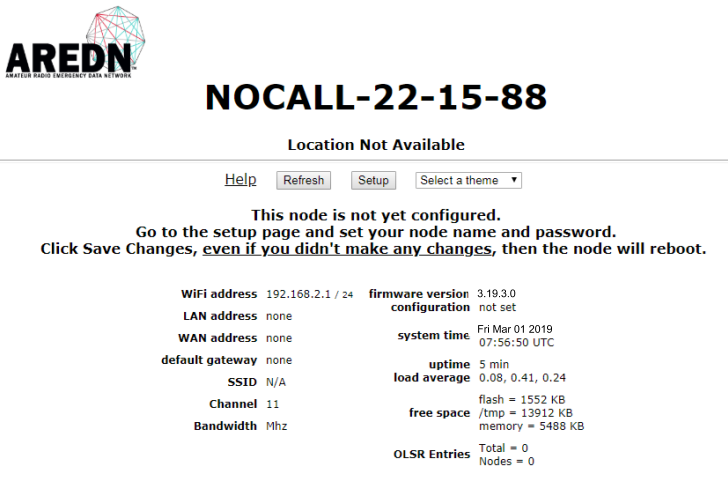
After you have installed the AREDN® firmware, rebooted the device, and connected your computer to the LAN port on the PoE you can navigate to the following URL: http://localnode:8080. The initial status page will be displayed, instructing you to configure your node by clicking the Setup button.
You will be prompted to enter the administrative login credentials. The default authentication credentials are:
roothsmmThe Basic Setup page will be displayed, as shown below.
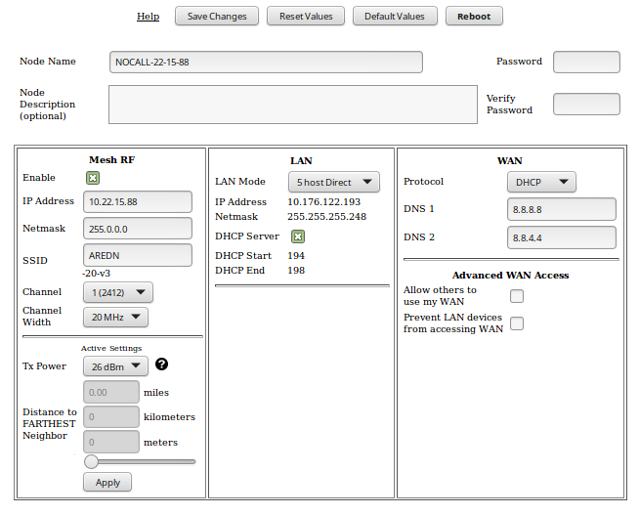
In order to get your new AREDN® node on the air, you need to enter the following items.
- Node Name
- Begin the node name with your callsign, followed by unique identifying information of your choice. Node names may contain up to 63 letters, numbers, and dashes, but cannot begin or end with a dash. Underscores, spaces, or any other characters are not allowed. Node names are not case sensitive, but the case will be preserved on the node status display. Amateur radio operators are required to identify all transmitting stations. The AREDN® node name is beaconed automatically by the node every five minutes, so the node name must contain your callsign. Recommended names follow the (callsign)-(label) format, such as AD5BC-MOBILE or AD5BC-1. This is similar to the MYCALL setting you would give a packet TNC, but without the 0-15 character restriction.
- Password
- Set a new administration password for the node. Enter it again in the Retype Password box to verify it is correct. The first time a node is configured it will require you to change the password. Be sure to remember or record the new password so you can use it for any future administrative tasks on the node.
- Node Description
- This is not a required field, but it is a good place to describe the features or function of this device. Many operators use this field to list their contact information, the radio model and antenna specifications, or the tactical purpose for the node. There are no character restrictions in the field, but the maximum length allowed is 210 characters.
- Mesh RF
- The IP Address, Netmask, and SSID fields are automatically calculated for you based on the unique MAC address of your node. Do not change these settings. Everything under the LAN and WAN columns can be left unchanged for now.
- Channel and Channel Width
- Nodes communicate only with other nodes that use the same channel and channel width. You can determine the correct settings by talking with other local node operators to find out which settings are required for joining their networks.
Active Settings
- Use the dropdown list to select the maximum output power for this device. Remember that amateur operators are required to use the minimum power necessary to make contact with other stations.
- Use the slider to select the maximum distance you estimate between your node and other neighboring nodes.
- Some devices have max power levels that change depending on the channel or frequency being used, and in that case the max level may change when you save the settings. The output power will be capped at the max level supported by the hardware for that frequency.
- Once these settings have been adjusted, click the Apply button.
- Optional Settings
- In this section you can enter your node’s latitude and longitude, as well as the grid square designator. Click the Apply Location Settings button after entering this information. You may also change the timezone for your node’s system time.
Once you have entered, applied, and verified that your node settings are correct, click the Save Changes button. Your node will record the new configuration settings and automatically reboot.